The Basics of Copy Photography
- Published:
- Length: 2369 words
- Reading Time: 12 minutes
My dad is a photographer who photographs all of my mom's and my artwork for us. The photos he takes are very high quality. They comply with the stringent requirements on photo size and quality mandated by the company that licenses our artwork.
At the request of my SAQA pod, he gave a presentation last weekend with helpful tips and guidelines for taking high-quality photographs of quilts and artwork in general. I've adapted his presentation to this blog post to make it available to anyone unable to attend the presentation. Enjoy!
If you don't care for any of the explanation or examples, scroll down to the bottom of this post to see a checklist of what to do and what settings to use.
SLR vs Cell Phone

The photo on the left was taken with my dad's Nikon d850 SLR camera and the one on the right was taken with his iPhone 7 Plus. At a glance, these photos look pretty much the same. However, the photo on the left is actually of a significantly higher quality.
Here are the stats for the two above photos:
- Nikon d850: 17" x 27" @ 300dpi - 110mb
- iPhone 7 Plus: 42" x 76" @ 72dpi - 2.1mb
The reason the Nikon is such a large file size is because it's recording so much more detail than the cellphone. As a result, the Nikon photo has a much higher resolution and is a much larger file size. Here is a close-up comparison of the two photos to show what I mean:
Assuming all other factors are controlled (ie. camera position, lighting, etc.), the cellphone picture would be okay for uploading to social media or submitting an entry to a juried show (since usually there are size limitations on photos of submissions anyhow). The cellphone picture would not be suitable for any kind of printed reproduction.
Our Studio Setup
The studio setup we use is pretty simple and is located in our garage. It looks like this:

The components of this studio are:
- Garage door closed
- Four 4' LED shop lights (LED lights will give 5k, or "natural", lighting)
- Camera mount on ceiling
- 4' x 3' wood stage on casters (on floor)
- 1/2" finished plywood
- 2" x 2" sub frame
- 4 casters
In a pinch, an alternative to the ceiling mount and wood stage would be to use a tripod for the camera and clamps on the garage door to hang your quilt. (We don't recommend this method, though, because it adds some other complications discussed a bit later on in this post.)
Putting together our studio cost approximately $250 total. The shop lights were $120 for all four and can be purchased from any home improvement store or online. The wood for the stage was about $40 as well. The camera mount and ballhead were about $40 each, but if you have a tripod already, you could use the ball head from it on the ceiling mount and not need to purchase a second.
To see the product listings for the lights, camera mount, and ball head we're using, click the links below.
- Utilitech Pro Strip Shop Light from Lowe's
- Meking Ceiling Mount from Amazon
- Sinnofoto Fluid Rotation Ball Head Plate from Amazon (This component is unnecessary if you already have a tripod because you could just use the plate from your tripod with the Meking ceiling mount. However, it's worth noting this ball head plate has a level on the bottom, which makes it easy to ensure the camera is level when standing on the floor.)
Camera & Lens Settings
Although this is vastly over-simplifying the complexity of a camera and its lens, for the purposes of this blog post we need to focus on three main components: aperture, ISO, and shutter.
Aperture: An opening inside the camera that allows light into the camera and controls the focal length. Set aperture priority mode on your camera and adjust the aperture to f16 or greater. (This means the opening will be very small; the smaller the opening, the larger the number.)
ISO: The digital equivalent of the light sensitivity rating on a roll of film. Adjusting the ISO tells the camera's sensor how much light to absorb. The lower the number, the more light that's absorbed. When photographing quilts in a studio environment, it's critical to have the sensor absorb as much light as possible. Set your camera's ISO to a maximum of 250. (For comparison, the Nikon d850 can have an ISO of up to 22,500.)
Shutter: A moving closure in the lens that allows light to pass through the aperture for a set period of time. When the camera is in aperture priority mode, the shutter speed will be automatic. With a small aperture, the shutter speed will be very slow.
One last lens setting worth mentioning: Lens Stabilization. Make sure this is turned off.
Lens stabilization is a setting (usually a little switch on the side of the lens) that when enabled, helps compensate for shakiness when shooting photos while holding the camera in your hands. The problem is, when the camera is mounted and being used hands-free, the stabilization feature can react to the shutter opening and closing, and actually unfocus the photograph.
Remote Camera Operation
It's very important to keep hands off the camera when actually taking the picture, since even the slightest vibration can cause the recorded image to go out of focus. (This is especially true when using the settings recommended in this blog post, since your camera's shutter speed will be 2-3 seconds.) There are two ways to take a photo without having to physically press the button on your camera.
1. Camera self-timer
Setting the timer on your camera is the most common option. This will let your camera take its photo a few seconds after you press the button to do so. However, if you're using a newer SLR camera, there might be a far more efficient way to go.
2. Cell phone app
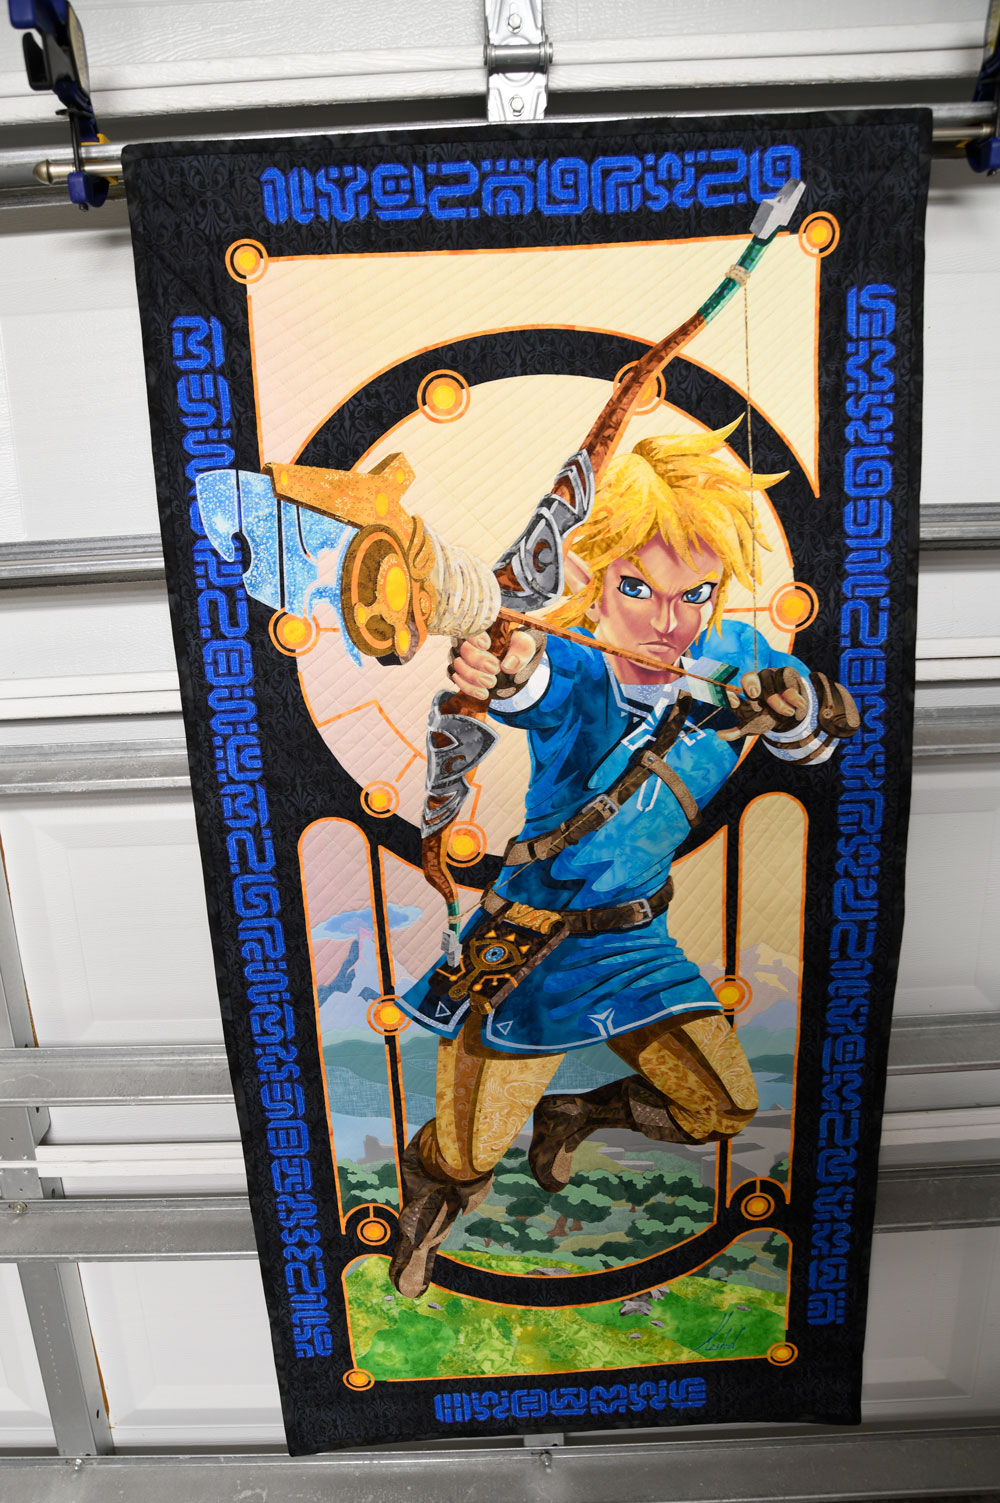
Most SLR cameras come with a cellphone app on both Android and iOS. The app that comes with my dad's Nikon d850 shows us what the camera "sees", lets us take a photograph, and even adjust focus, exposure, and a few other settings. I'm able to sit on the floor and move the stage as necessary while using the app to take each photograph without having to get up on a ladder to re-set the camera self-timer every time.
Here is a pic of my Link quilt on the stage and me using the Nikon app on my phone.
Balancing Light
Photographing artwork outside should not be the first choice of location because there are so many variables that are hard to control. For example:
- Sunlight is uneven. A cloud passing in front of the sun completely changes how the quilt looks.
- Ambient light is reflected off trees, cars, driveways, etc.
- Wind can shake the camera and subject
Having a studio indoors gives you complete control over the lighting situation. Ideally you would have an LED shop light that throws light evenly across your picture. However, I've used a bulb in the example diagrams below just to make it easy to understand.
Your goal should be to evenly light your entire picture. If you have a set of lights like we use (shown the further up the page), that's easy to do. If you only have one light, you'll run into the problem as shown in the first diagram here:
The light from a single light source does not evenly light the entire picture. If you do not have multiple light sources, you can use a fill card (shown in the second diagram above) to help reflect some light onto a different part of your picture.
A fill card's only requirement is that it's very light in color. I personally recommend using white foam core. Foam core is stiff and sturdy, so it's easy to hold or prop in place. Its surface also has a bit of shininess, so it will reflect even more light than something like a sheet of paper.
Camera Positioning
Your camera should be square to your subject to avoid getting a trapezoidal image. This means it should be level and aligned to the center of the quilt, artwork, or whatever you're photographing. When using a tripod, your camera should be aligned like this:
In the setup we use with a ceiling mount, this part is easy. The ball head has a level on it, which makes it easy to align the camera perfectly straight. The artwork on the stage is perfectly flat and always at the same angle to the camera.
In addition, set the zoom on your camera lens to at least 100mm. This will help keep the edges of your quilt straight.
This is an example of my Link quilt deliberately taken from a poor angle:
Controlling Reflection
I just got through explaining how it's important to properly align your camera, but when it comes to managing glare, all of that has to go out the window.
There is a lens attachment called a polarizer that does wonders for reducing glare when shooting outside. Unfortunately, though, it's basically useless in a controlled studio environment. Our only option is to deliberately set the camera off-center. Here is an above-view diagram:

Glare is caused when light rays bounce off a reflective surface directly into the camera. To prevent that, the camera should be moved slightly to the side, as shown in the diagram above. Move the camera as little as possible to minimize distortion.
In addition, adjust the camera's f-stop (aperture) to maximum available on your lens to increase depth of field.
Lastly, this method will deliberately create a trapezoidal image. That distortion has to be corrected in photo-editing software (such as Photoshop). Keep in mind this process WILL reduce the image quality.
Here is an example of managing glare using a painting done by my mom. She painted it using glossy acrylic paint.
Photomerge
One thing we routinely do with my large artwork is photograph it in segments. This lets me end up with a high resolution, print-quality composite image that is full-size.
Think of it like this: Each photo taken by the Nikon d850 is 17" x 27" @ 300 dpi. My Link quilt is 26" x 52". If I photographed my entire Link quilt by filling the frame, the resulting photograph would be 17" x 27" @ 300 dpi. That size is only suitable for printing at 17" x 27". In order to have a photograph of Link that is 26" x 52" @ 300 dpi, I need to combine several photos together. Photoshop's automated tool to do just that is called Photomerge.
Look at the example below. On the left are the six photographs of Link. On the right is the Photomerged result.
You might be thinking I really only needed 4 images to Photomerge. Technically, you would be correct. However, Photomerge works best with lots of overlap between images. I opted to take 6 images instead to make it easy for the tool to correctly combine my photos.
Shoot RAW Files
No photograph is perfect when taken, including photographs of artwork. Post-processing in Photoshop or another editing program should be a standard part of your routine. To that end, RAW files add a slew of extra editing capabilities.
A RAW file is the digital equivalent of unprocessed film. When opened in editing software, there is an entirely unique menu that has editing options unavailable to other image formats. If your camera has the capability, I highly recommend setting it to record RAW files as well as JPGs. (Even though you'll be editing and finalizing your art photographs using the RAW files, having the JPGs makes it easy to check the photo quality in a preview while your studio is set up.)
Checklist
This checklist is a summary of all the settings discussed in the above post. Use it as a guide when setting up your camera and studio to take high-quality photos of your art.
Camera
- Use a tripod or other stable mount
- Use a remote trigger (phone app) or self timer
- Center to the subject
- Set for low ISO (no higher than 250)
- Set to aperture priority mode
- Set file size as large as possible (high resolution)
- Set to record RAW files and JPGs
Lens
- Zoom to at least 100mm
- Adjust aperture for minimum f16 (preferably higher)
- Turn off lens stabilization
Lighting
- Do not photograph outside
- Balance light across subject
- Use shop lights (ideally) and fill cards if necessary
