Managing DIY Cutting Mistakes
- Published:
- Length: 944 words
- Reading Time: 5 minutes
Even if I'm as careful as I possibly can be to prepare my fabric correctly, arrange the layout for easy cutting, iron twice, use a fresh blade...sometimes mistakes still happen. There are a few different ways you can try to fix or salvage the messed-up piece, and that's what this post is all about.
Don't Panic
Definitely the most important thing to do is NOT PANIC. It's incredibly frustrating (and scary) to lift a freshly-cut swatch of fabric from a sticky mat and realize, uh-oh, not everything cut correctly. Believe me, I have absolutely been there. However, there is an extremely good chance your fabric pieces can be saved, so just take a deep breath and assess the situation.
Skips and Jumps: Snip with Scissors
Sometimes the fabric isn't attached well enough to the sticky mat and bunches up a bit. This can cause the cutting blade to jump or skip, meaning that small section doesn't get cut at all. I almost never have this problem with batik fabrics, but it's not uncommon with print fabrics.
When this happens, usually 95% or more of the piece will get cut correctly, but 5% or less will not. The "jumped" sections of fabric are typically a couple of millimeters in length. The easiest thing to do in this scenario is to just snip the still-connected section with scissors as you lift it off the sticky mat.
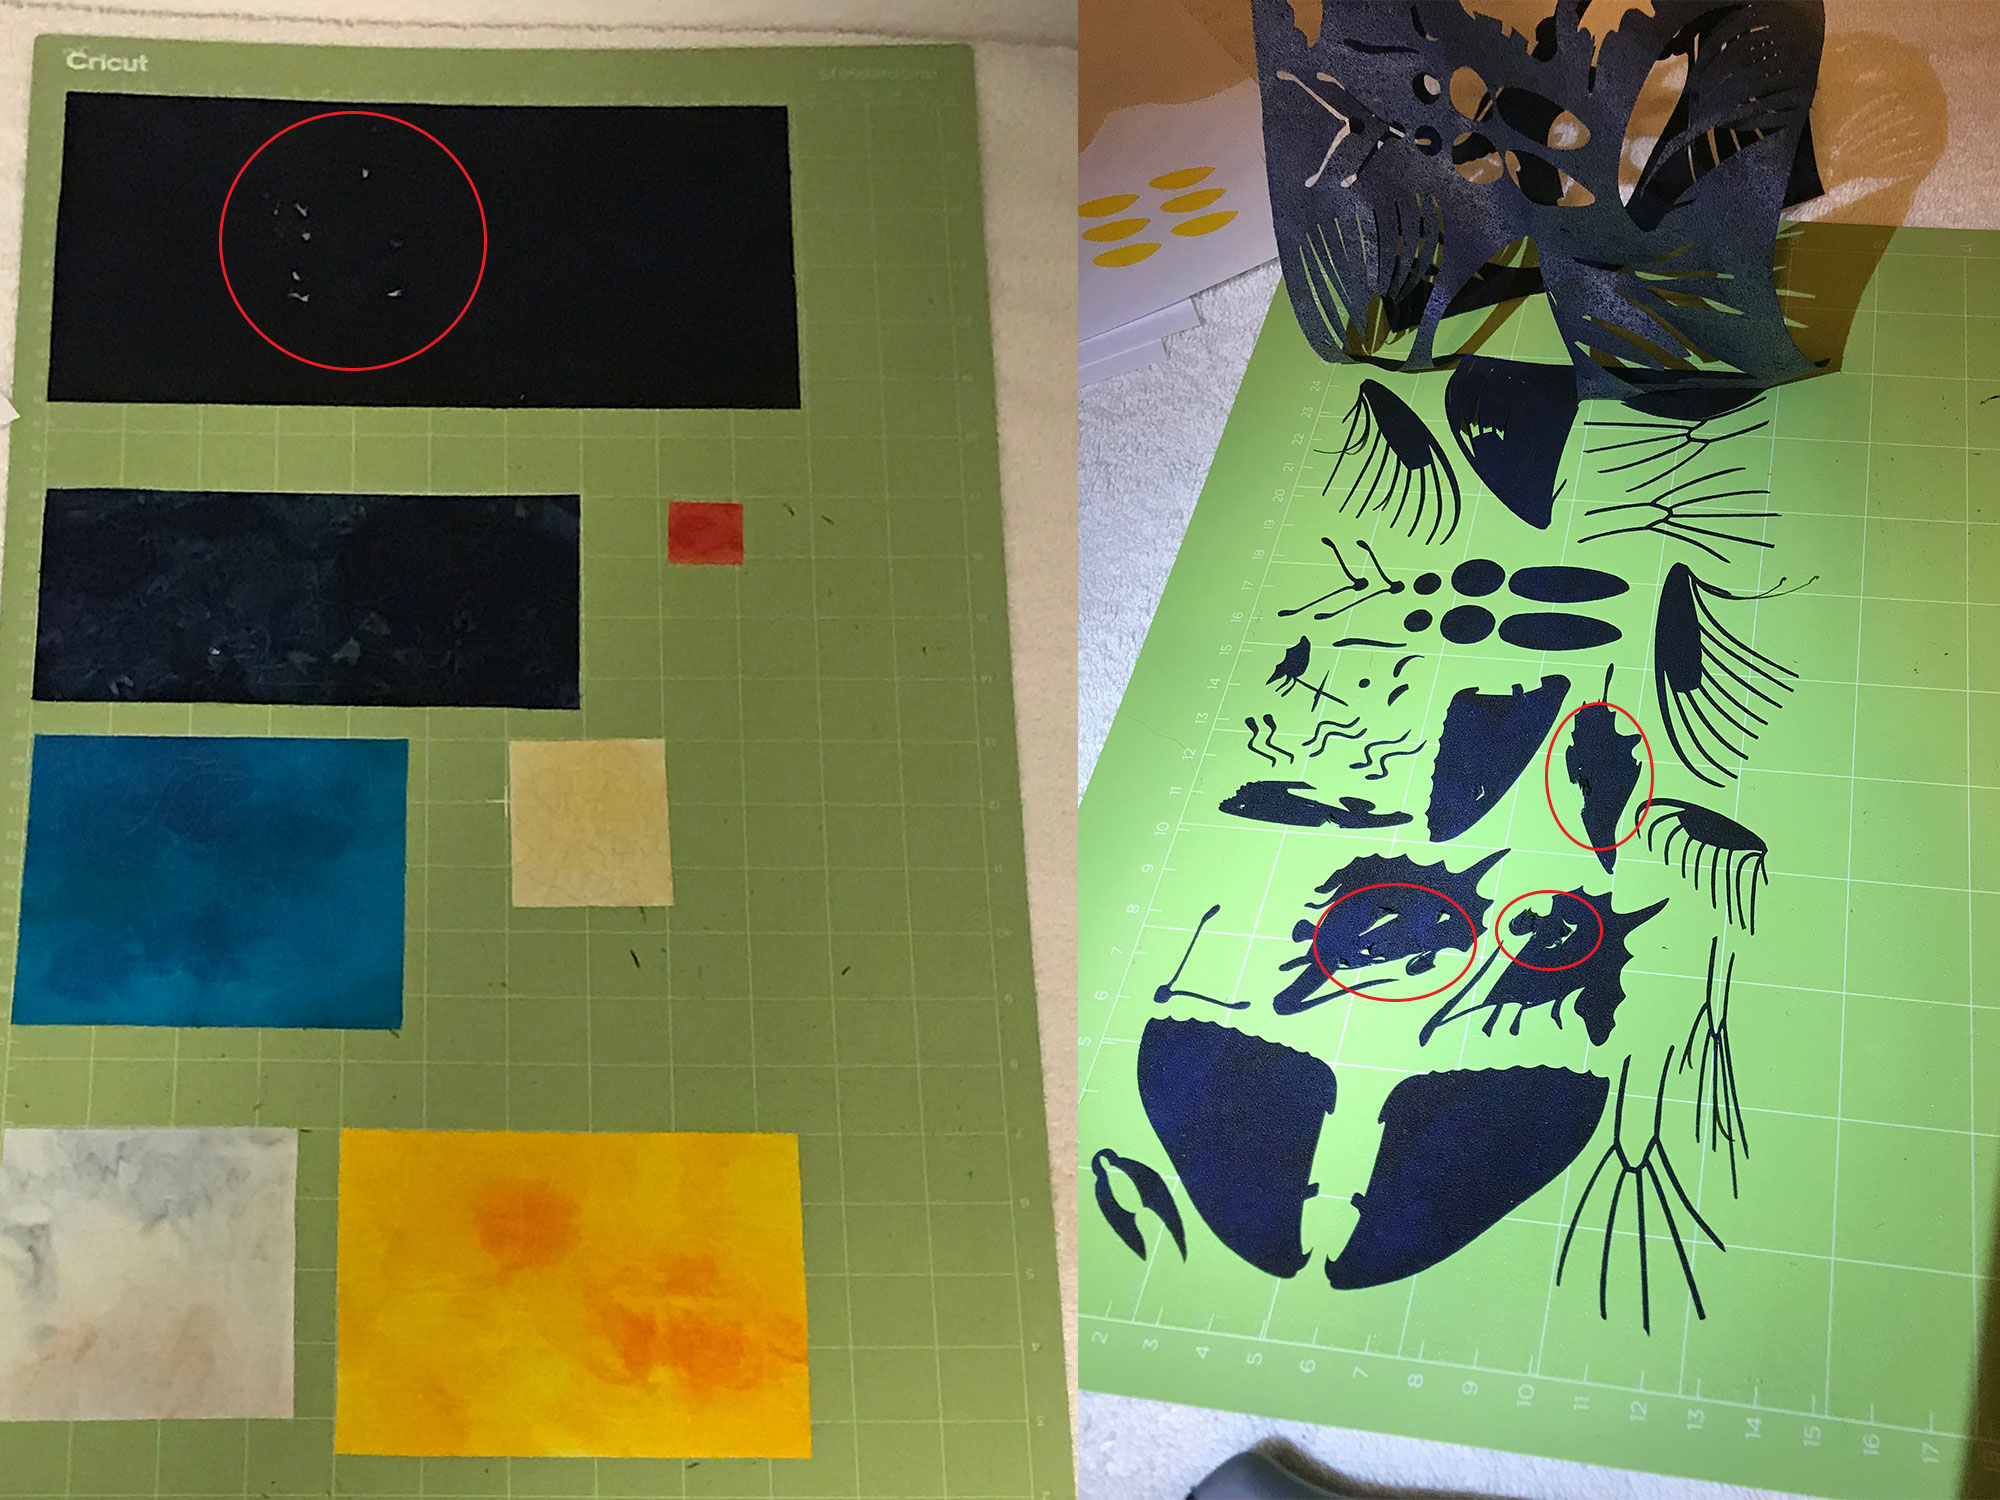
This is a photo of the Cricut sticky mat layout on which I cut some butterfly wings. On the right is a close-up of the wings. I've circled some mistakes with red circles.
Two Pieces: Recombine on Artwork
If I'm cutting something extremely delicate, such as the veins in butterfly wings, sometimes the blade accidentally cuts part of a vein in half. This happens because the super skinny wing veins sometimes don't have enough stick on the mat to withstand the friction caused by the dragging blade.
To fix this mistake, I start by snipping any still-connected areas and trimming any frays with scissors. Next, I separate the disconnected section and the rest of the shape (a butterfly wing, in this case) and lift both from the sticky mat. Both pieces are still usable.
When assembling my pictures, I can use the fusible on the back of both sections to glue them into place as though they had never been cut apart. No one will ever know.
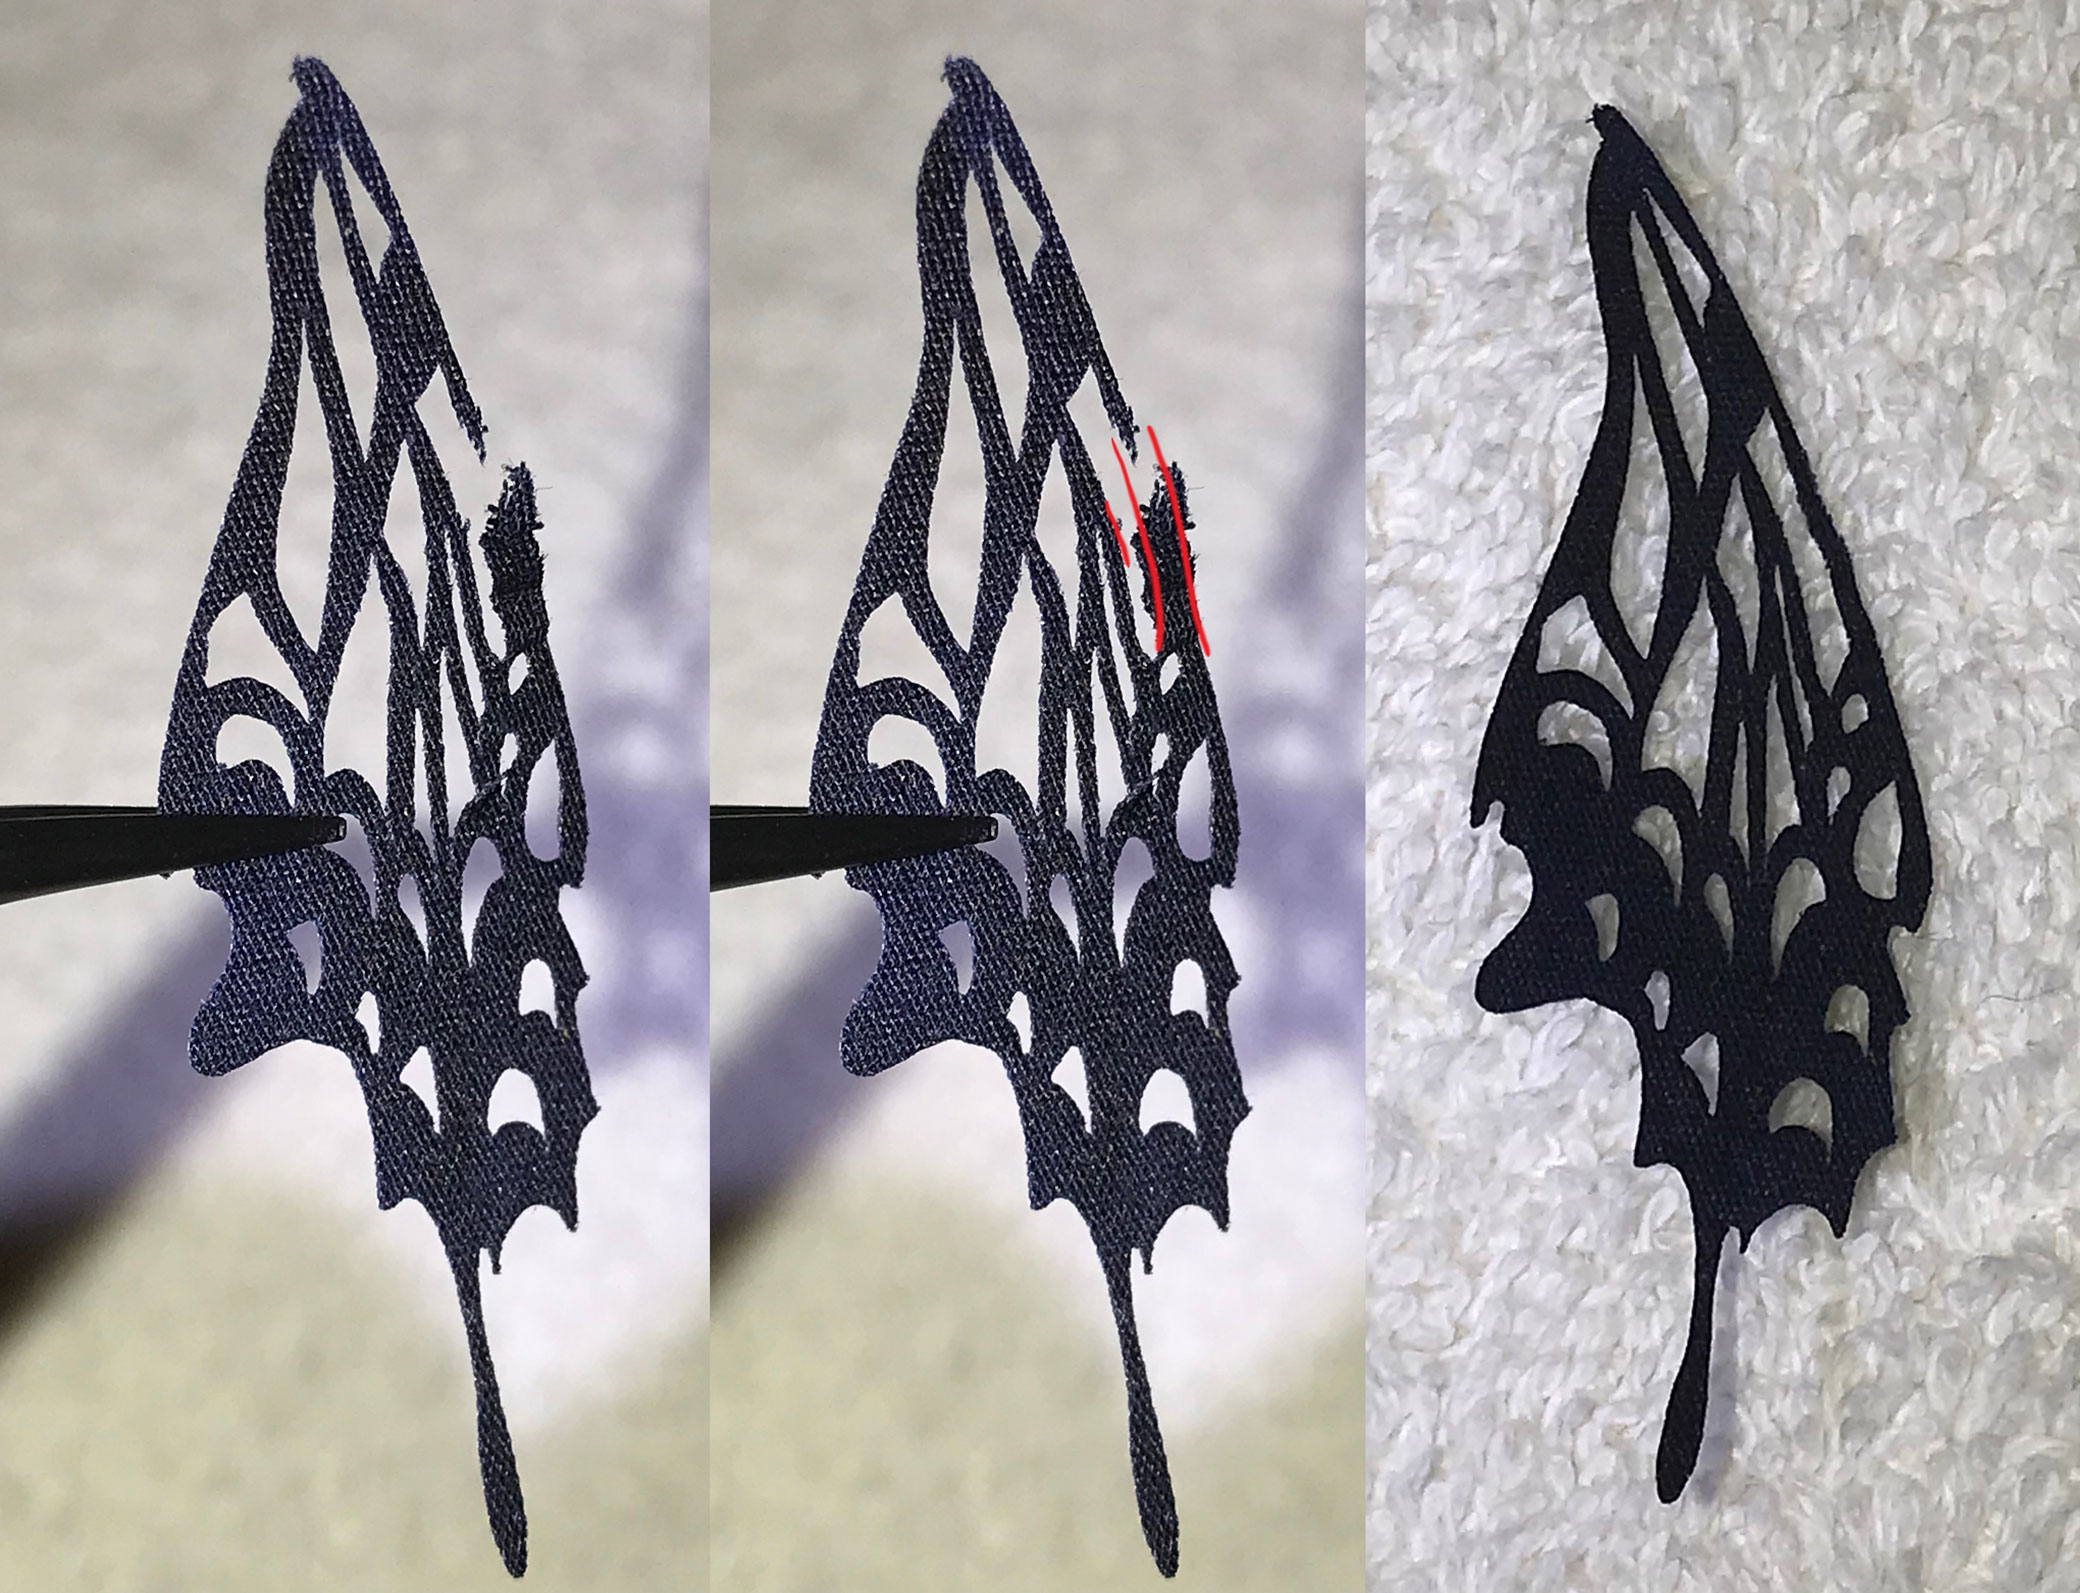
Here is a close-up of one of the butterfly wings. There's a small section on the right that got pulled up by the dragging blade and cut incorrectly. In the center photo, the red lines are indicators of where I cut with scissors to trim off the frays and correct the cut. The photo on the right is the butterfly wing after I made the scissor cuts.
Note: The "fixed" section of wing in the far right photo isn't actually attached. I've just sort of molded it into place. Once it gets ironed into place on the picture, no one will ever be able to tell.
Catastrophic Failure: Start From the Beginning
The absolute worst-case scenario is to have a piece get so messed up during the cutting process that it simply cannot be salvaged. The only time I have ever had this happen is when I first started experimenting with cutting butterfly wings, and the problem turned out to be three-fold. (Unfortunately, I don't have a photo of that original attempt. The photos I've been using in this post are from version 2.0, after I made the following corrections.)
The first problem was I had aligned my pieces too close together in the SVG file I uploaded to the Cricut software. This reduced the amount of fabric left between each piece, which also reduced the amount of friction on the sticky mat. As the blade cut the pieces, sections of fabric were being pulled up off the mat and ruining the cut. I solved this problem by simply separating the pieces a bit more in the digital file. (Note: If you're using one of my Cricut Edition patterns, this should never be a problem for you. I personally cut and assemble every pattern before I release it for sale. I fix any areas that are getting cut too close.)
The second problem was how I had prepared my fabric for cutting. I had used Terial Magic, which created ripples in the fabric that were not getting stuck to the sticky mat. I fixed this problem by treating the new piece of fabric with Fray Check instead.
Lastly, I had been trying to cut the wings from a solid black fabric. Solids do not have as high of a thread count as batiks, so the entire cutting problem was getting compounded by the type of fabric. In the re-cut I used a black batik fabric instead of the solid, and version 2.0 of the wings cut very well, although not without a few minor mistakes, as you've seen in this post.
This is the finished butterfly picture, "Natural Beauty." I've also provided a close-up of the butterfly whose wings got messed up so you can see how they look after salvaging. "Natural Beauty" was actually my donation for the 2018 SAQA Benefit Auction.
