Stained Glass Fox Process
- Published:
- Length: 620 words
- Reading Time: 4 minutes
Ever since learning about stained glass art quilts, I've had an idea in the back of my mind about how I would create one. I love the look, as do many people. But creating that illusion of light, as though the sun is shining through, is tricky. And I'm a storyteller, so I had no intention of creating an abstract pattern; I wanted to do a scene or some other recognizable imagery.
All of these thoughts have been percolating in my brain for the past couple of years. But earlier this year, an opportunity arose that I could use to test my theory. The SAQA Spotlight Auction was coming up, and I wanted to donate an artwork to support the organization. I decided to do a practice stained glass design out of fabric as a proof of concept. And thus the idea for my Stained Glass Fox was born.
Stained Glass Fox

The Spotlight Auction is for artworks that are only 6" x 8" in size. They're pretty small. I also knew that doing a stained glass design was going to mean lots of itsy bitsy pieces of fabric, especially the black caming. Those thin lines are only 3pt thick, which is about 1/16 of an inch.
So I fell back on my original method of making artwork out of fabric, which eliminates the sewing entirely. That way, I could cut fabric as small as I wanted without running the risk of damaging the fibers with a needle.
I designed the black caming to go on top of the color. That meant the black would be all one piece (technically two since the outer border isn't connected to the inner window).
Designing the fox with the black on top had two big advantages:
- I could combine some of the adjacent sections of color into one piece of fabric. This would reduce the total number of pieces in the design.
- I could see the template while ironing the colored sections together. (If the black was intended to go behind the color, it would cover the template entirely.)
Here's the template showing the colored pieces on the left and the black caming on the right:
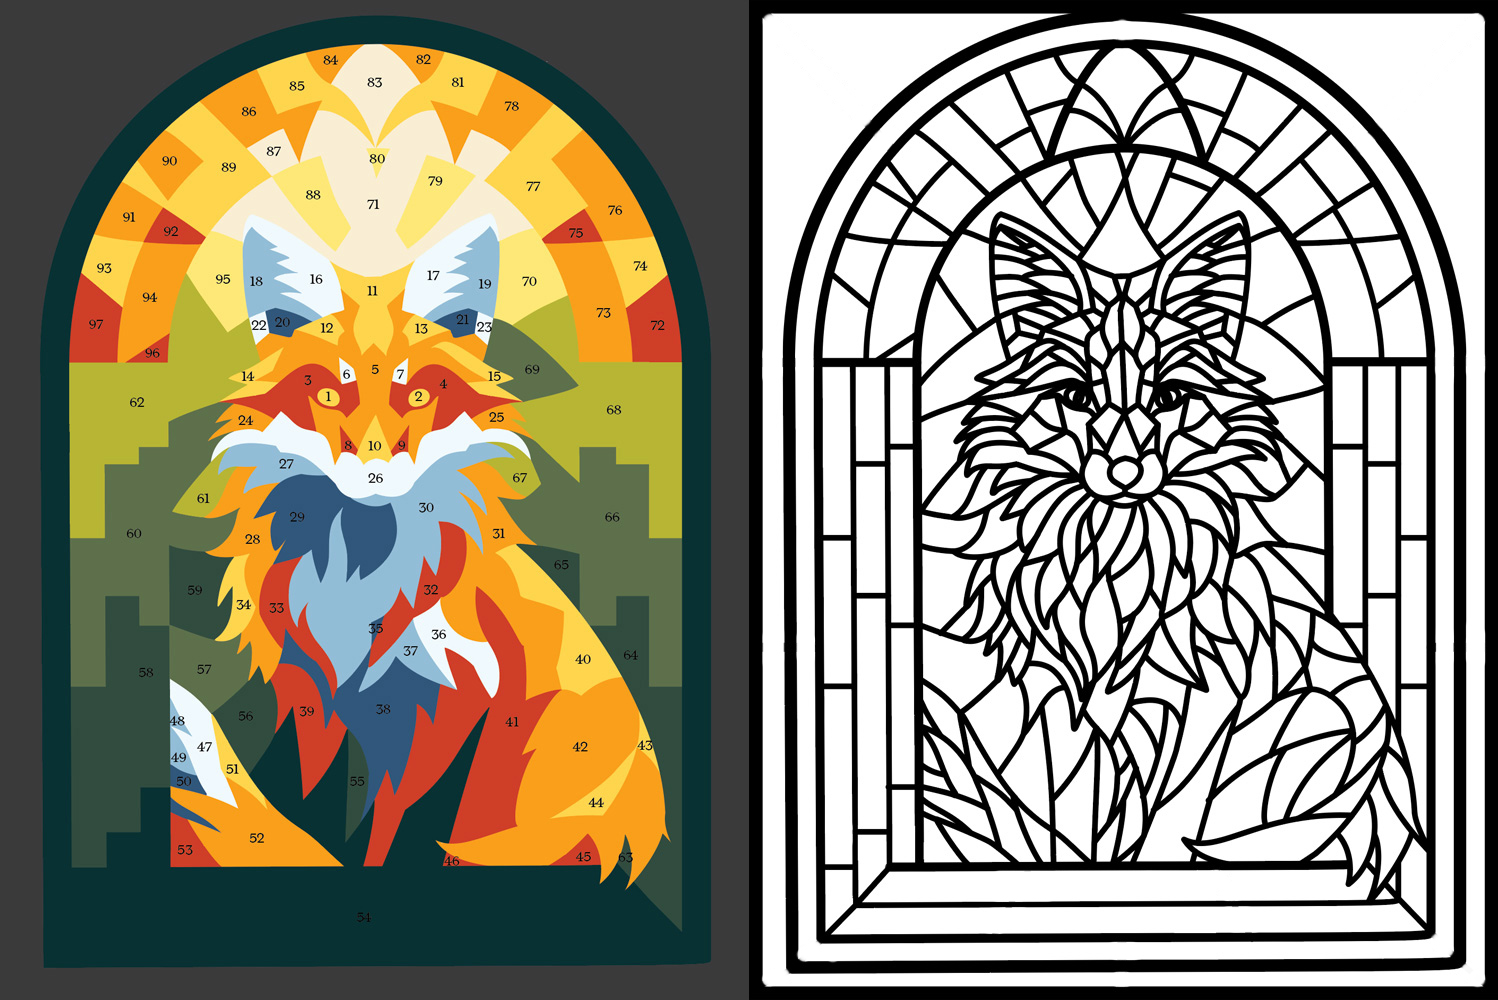
I said earlier that this picture was intended to not get stitched. But unlike my other designs, none of the colored pieces overlap each other; they fit together perfectly like a jigsaw puzzle.
No quilting meant no quilt sandwich, but those pieces had to fuse to something. So I printed the template itself as a simple, grey outline on 300gsm acid-free watercolor paper. Then I could fuse the fabric directly to the paper.

One all of the color was in place, I VERY CAREFULLY lined up the black caming and ironed it in place on top. Last but not least, I trimmed the paper to the edge of the fabric, making the artwork exactly 6" x 8".
Here's the finished fox and a close-up so you can see the fabric detail.

This little guy was very well received at the Spotlight event; he sold for more money than any artwork in the auction. I'm thrilled that SAQA benefited so much from this little donation, and he was fast, easy, and fun to make. I see more little stained glass critters in my future.
